If you’re in a hurry please skip to the Porsche 911 Rear Backdate video.
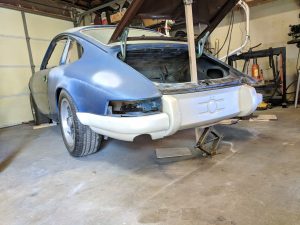
This week my Porsche 911 rear bumper backdate process begins immediately after I finished the front. Click here for the front backdate process. I’m excited to be working on a different section of the car finally. I thought the rear backdate would be easier, but that is never the case. The rear reflector panel sheet metal had to be removed. This part was fairly simple to remove but it did reveal additional metal work needed in the corners (At the junction between the rear latch panel and rear quarter).
Start Cutting! Porsche 911 Rear Backdate
I also quickly realized that the fiberglass mounting brackets interfere with current impact bumper mounting brackets. So I decided to cut these heavy guage parts off with my plasma cutter and accidentally caught a rubber seal on fire. At least I caught it on camera! The bad news I quickly discovered my fire extinguisher didn’t work. I put it out with a wet rag thankfully.
After the bumper brackets were removed I weighed them on a scale and discovered they weigh 10lbs!
Then I trial fit the fiberglass bumper and it didn’t fit well at all. This bumper came from a car with fender flares so I expected a better fit honestly. The bumper width surprised me even at the tail lights. I contemplated selling the bumper and starting again, but I cut it into three pieces to make it fit the best I can. Now I believe I’m only going to use the side portions and use the factory steel section in the middle. Click here to see the hybrid steel/fiberglass solution.

So nothing is ever easy especially when building a hotrod Porsche with parts from all over the place and from different year cars. So, wish me luck!
After removing all the brackets and sheetmetal needed to backdate the rear it was evident that I needed to finish the corners where the latch panel meets the rear quarter panels. Previously these corners hid behind the large reflector panel, but now they are visible. I decided to weld the seams together and fill/contour the shape with lead autobody filler. Due to the high stress created by the corner and the close proximity to the rear engine mounts I believe lead is superior to plastic filler here. You can see the leadwork in the video below: